And now I present to you, my tutorial for modifying the 'ebay' triggers.
Before I go too far though, there are a few things I need to mention. First (and probably foremost), I cannot be held responsible for any damage done to any transmitters/receivers while attempting these modifications. That said, there are certain skills required to do this correctly. Soldering being the most obvious and probably most difficult. I am no master at soldering, but make sure you know how to correctly solder before attempting this. Here is a good place to start learning or refresh yourself if you aren’t sure. You’ll also need to be able to drill steadily. Very important in that there are times when the drill will come close to the circuit board, and circuit boards don’t generally take well to spinning drill bits.
Next I’ll go over the supplies needed:
Tools:
-Drill
-Drill bits (I used a 3/16 and a 3/32)
-Soldering Iron
-Needle nose pliers
You’ll also need solder, wire (I used stranded copper wire), and epoxy.
For the actual modifications:
-433Mhz Antenna
I bought this from http://www.digi-key.com/, product #ANT-433-CW-RH, approximate price $6.32. It’s a 433MHz ¼ Wave Whip Antenna with an RP-SMA connection, allowing it to be connected and disconnected as needed so it doesn’t get snapped off in your camera bag. Because of this, you’ll also need…
-RP-SMA Connector
I bought this at the same site, product # CONREVSMA004, approximate price $3.22.
-Lanyard
I grabbed a lanyard for each receiver from random electronics around my house. They generally come with cell phones, mp3 players, and lots of other random small electronics (including many small digital cameras), so finding 2 wasn’t difficult for me. If you need to buy them, I know they sell them at places like Ritz/Wolf camera, but they’re probably ridiculously priced. You’re on your own for finding them though.
-2xAA
This I bought from the local Radio Shack. It’s an enclosed battery holder for 2 AA batteries. Technically you could use the 2xAAA battery holder too, but I really don’t see the point. The reason I got the enclosed case was for a more professional look. In the end there are no exposed wires, and the look is much nicer than the exposed battery cases. The price on these is right around $1.90 each I believe.
That’s all of the equipment/supplies needed. The antenna and connector came out to $15.59 with S&H (there’s a $5 charge for orders under $25), and I just picked up the battery cases locally. All told, under $20 for the supplies, plus costs of any tools and expendable supplies (i.e. wire, epoxy, etc.). This put my total cost with the transmitter and 2 receivers (plus S&H) at right around $82.
Now for the real meat of the tutorial. I’ll start with the transmitter antenna modification, as it is probably the most important in terms of the modification itself and the results it garners. Make sure to read through the whole tutorial before you start the work. And make sure to remove all batteries before as well.


To begin, you’ll have to drill the hole for the connector through the top plate of the transmitter. This seems simple, but in reality is probably the most difficult part for the mod, simply because there is limited room. If the hole is too close to the front, the connector won’t fit. If it’s too close to the back, it’ll hit the circuit board and again, won’t fit. Measure twice, cut once. It may help to drill a starter hole and move from there. I used the 3/16 bit, though in actuality it needs to be a bit larger hole than that. All I did was shave off small sections from the hole to make it bigger, so I honestly can’t tell you if a ¼ bit will work perfectly or not, but I suspect it would. I put the hole about 7/16” from the front, and 3/8” from the side with the 2.5mm jack. You can test the fit of the connector, but don’t yet mount it in.
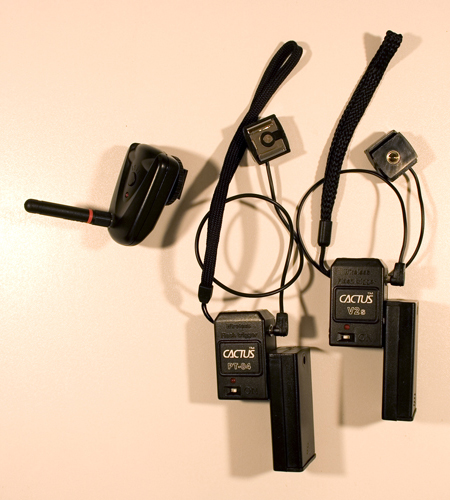
Next, solder about 3 inches of wire to the bottom of the connector. Do this before you mount the connector, as it will be easier to keep from melting the plastic, unless you’re confident in your steady hand. I say 3” of wire because then you can cut to length before soldering the other end into the circuit board. When soldering the wire to the connector, you will probably have to solder it in a loop around the pin on the connector in order to allow the assembly to fit inside the transmitter, as shown.
Once the wire is soldered to the connector, go ahead and mount the connector to the top plate using the mounting nut that comes on the connector. After that, you’re ready to get the wire ready to be soldered to the circuit board. You’ll want to make sure you have enough room that it won’t be a stretch and won’t get in the way of the center post (where the top plate is screwed to the bottom plate), but not so much wire that there’s lots of extra in the transmitter.


Once you have the wire cut to length and the end stripped, go ahead and solder the wire to the open, tinned hole on the circuit board (near the front, opposite the side with the 2.5mm jack).
********EDIT********
 Another Strobist follower, vaddzagg, came up with an alternative method for the internal wire used to connect the antenna to the circuit board:
He used a length of wire equal to 1/4 wavelength of 433Mhz, in order to make the entire antenna including the wire a 1/2 wave antenna. He found that this improved his transmitter a bit more, you can send him mail via flickr here.
*********************
With that complete, your antenna mod should be done. All that is left is to attach the top plate, and screw in the antenna itself into the connector. This modification alone should give you a great boost to distance and reliability.
The next modification will be the simplest, the lanyard for the receivers. All I did for this was to drill two small holes near the top of the receiver on the side opposite the PC jack. I used the 3/32 bit, and drilled the holes about 3/32” apart from each other. Be careful with the drill, as if you go too far into the receiver after pushing through the case, you’ll hit wire. I then threaded the end of the lanyard in one hole and out the other (using a wire leader to pull it through), and attached the lanyard as shown. Easy modification, and now you can hang the receiver from anywhere you can hang a Pocket Wizard.


The last modification is the external battery pack for the receiver. This will increase the life of the receiver during a shoot, and also decrease the cost of batteries for the receiver (2 AA batteries versus the $10 CR2 3V batteries). As an aside, I use regular AA batteries instead of rechargeable batteries, so I have no idea how rechargeable batteries will work. I can’t imagine it would make much of a difference, but I’m just letting you know.

The first step in the battery mod is to get the case ready to be attached to the receiver. To do this, begin by simply removing the cover with a small Phillips-head screwdriver. Inside you’ll notice where the two wires come into the case and are soldered to small metal plates at the top of the case. Use the needle nose pliers to gently pull the plates out of the plastic case. They’ll put up a small fight, but be gentle and they’ll come out easy enough. Once they’re free of the case, pull them both out with the wires attached. We’ll put them back in later.

Now the case is ready to be attached to the receiver with some epoxy. First, line up the case exactly where you’ll want it on the receiver. If you look at my photos, you’ll see that I’ve attached it to the same side as the PC jack, about half way down the side and flush with the front of the receiver. At this location, the hole that we’ll drill will be in a convenient spot so as not to interfere with the spring or the circuit board inside. Once you have the location you want, you’re ready to epoxy. Remember that you want to epoxy the back of the battery case, not the front where the screw is to open it. Epoxy is very strong stuff, so you don’t need to overdo it (read: A little dab will do ya!). Put some epoxy on both the receiver and the battery case, and hold them in place until they set a bit and you can let them dry on their own. Once it’s dried and cured, you’re set to move on to the next step.
Next you’ll drill the hole through both cases to allow the wires to move through from the battery case to the receiver. When you’re drilling the hole, remember again to measure twice, cut once. The hole needs to be far enough from the front of the receiver so as to not hit the circuit board, but not so far it’s outside the receiver altogether. I found that the best place for the hole just happened to be where there’s a nice little post inside the battery cover (just to the left of the center post where the screw for the battery case cover goes). So I managed to grab something to wedge the post out (it comes off/out pretty easy, just use a flat head screwdriver or something similar), and then used that mark to drill the hole. I used the 3/32 bit again, but it’s a pretty tight fit for the wires. It should work, you just may have to shave a side of the hole a bit to give yourself a little extra room. Go VERY slow with this drilling, too fast and once you push through the case you’ll push through circuitry. And then all is for naught. So BE CAREFUL.


Once the hole is drilled, we can put the wires back into the case. First push the ends of the wires (opposite the ends soldered to the metal plates) through the new hole into the receiver. Pull them through a little ways and then set the metal plates back into their positions in the battery case, just as they were before they were pulled out. They should stay put pretty well, but if you want you can put a little superglue at the corners to keep them there (I didn’t bother, they friction fit just fine by me). Once the plates are in, pull the wires in the rest of the way, being careful to make sure they sit in the battery case well. Now we’ll get the wires ready to be soldered in the receiver.
First, we want to make sure we’re soldering the correct wire in the correct place. The red wire is positive, black is negative. If you don’t already know this, put down the soldering iron and step away. Just kidding. But not really.

The black wire is going to be soldered to the top of the metal plate with the spring attached, and the red wire will be soldered to the opposite plate. Before soldering, cut the wires to a manageable length such as shown in the photo. Once the length is correct, you’ll simply solder the wires in place. This can get a little tricky as you don’t want to melt the plastic of the case or touch any other circuitry, but very doable. Just try to bend and place the wire so it sits on the metal plate on its own before soldering.
Once you’ve got the wires soldered in correctly, you should be good to go. Throw a couple AA batteries in the case, put both covers on, and that’s it!
That should be it for all three modifications. Just make sure to take your time and do it right, and I think you’ll be very pleased with the results. There may be more modifications in the future, I’m always trying to make the equipment I have better in whatever ways I can. I hope this helps, if you have any questions don’t hesitate to ask. My Flickr account is ‘kuster’, and my email address is jeremy@jeremykuster.com. Let me know how it turns out (unless something goes wrong :-P).

114 comments:
I mean, well done!
I no longer have the V2's, but I did do this mod to them which made them much more robust. I imagine if I had done the antenna mod and battery mod, I may have held on to them!
One other thing - if you do the battery mod as mentioned above, that will give you plenty of room for putting in the 1/8" plug, or filling the PC with epoxy.
http://www.flickr.com/groups/strobist/discuss/72157600352298821/?search=cactus+v2+epoxy
One note - you have to scroll down past my rants to see the modification I did..
Please excuse the horrible lighting for the photos, I just tried to get the tutorial up as fast as I could :-\
Very nice tutorial. I thought the same mods but I haven't done them yet.
It's good to see that the antenna modification can be done.
Have you done real world experiments regarding transmitter distance? What I'm getting at is...how much farther than before does it work reliably?
I did actually, go here to see my results :-)
http://www.flickr.com/groups/strobist/discuss/72157602622255547/
i was wondering why you have a pc-to-hotshoe adapter connected when there already is a built-in hotshoe adapter?
whats the cord with the hot shoe attached, where do i get those? Thanks!
The built in hotshoe would require me to use the bracket for the receiver to mount it to a stand. The hotshoe-to-PC cord I find to be much more useful, I just mount the hotshoe to a stand and hang the receiver from the stand as well.
As for where I got the cord, I bought it a while back at a Ritz/Wolf camera I think, I bought both of them long before I ever thought about the triggers. I honestly don't remember how much they were though.
Hi. Nice tutorial. I have one tips and one question. Do you try to put an antenna to receiver? This probably improves the range. Another thing is solder the mass antenna to mass transmitter. All antenna has to part and you only connect one of this.
Sorry for such a basic question but the gadget page left me a tad confused. I have 3 brands of flash. Vivitar285, older Metz CT-60, and Canon 580ex. Do I need to order different receivers for each of the flashes?
To be honest, I'm not entirely sure. I fire an old Vivitar (not a 285 or even a 283) and a Canon 420EX with the same receivers (the V2s), so I wouldn't think you'd have to have different receivers for them. As for the Metz though, no clue. I'd just buy one receiver and see if it works on all three, then go ahead and buy the other two. More in shipping maybe, but a little peace of mind possibly.
Thanks, I'll do that. And thanks for a terrific blog.
Anyone in the UK can get the bits and pieces from Maplin on the highstreet, helical antenna (only with a screw thread) at http://www.maplin.co.uk/module.aspx?ModuleNo=24845&doy=1m11
Very well done
Great Tutorial. I was going to order a set of these, but I wanted to do more research on them. I found this and now I'm ok with it. Gonna order a set today. What kind of range were you getting our of them before the mods? Thanks...Chris
Hello,
very nice tutorial.
One question: how did you get the Hotshoe of the triggers, what did you use for that?
lg
Tina
Hallo.
I was wandering could we use two flashes on this setup.Could you try one flash at the pc-to-hotshoe adapter connected and one another at the built-in hotshoe adapter.
Thanks Very nice tutorial indeed
anyone know if this will work with the 16 channel? I'm assuming its all the same just want to know before i order.
Great tutorial!
But I ran into problem with signal stability. In 50% of cases signal from antenna did not travel or travel to very little distance. My guess was that wire, which connects antenna and PCB modifies total antenna length, and it ruins quality of signal from transmitter.
I modified wire which connects antenna and PCB, to make it match 1/4 of wavelength, so, i used thin wire 6.82 inch long, twist it to spiral and put inside the body. Now I have antenna total 1/2 of wavelength (1/4 antenna by it self and 1/4 wire) and it runs flawless and shoot pretty far, and 100% stable. If you interested I may provide you a picture of this mod to update your write-up.
questions.. I have a 30d with 580ex, cactus v2 and new batteries. first, i did the antenna mod and it doesnt seem to work great at short distances. i get it to fire 70 percent of the time. It also fires on its own about once every five minutes. Is there something i should do with this mod for my canon gear to get better results.
Also, with high speed sync on my flash i used to be able to sync well over 250 shutter, when using the cactus v2, i only get 200.
vaddzagg, i would like to see a picture. what is your setup, canon, nikon, what flash etc..
Thank you for the great post and mod. It is getting mentioned at NoBS Photosuccess.com as well.
I'm going to get a set of V2's now for sure.
travisty10: here is the link to the
picture
travisty10: There shouldn't be anything extra for Canon shooters, as I'm a Canon shooter as well. But you might want to make sure you have the V2s, and not the V2, because they apparently updated something in the trigger to work with Canon flashes with the V2s'.
vaddzagg: I like your train of thought, and I'm glad it works so well for you :-D I don't know that I'll change the mod, as I have no problems with the short wire, but I may link to your photo as an alternative method if that' alright.
kuster: please feel free to add my photo :)
Just completed mine--works great. Fantastic distance. I did mine as vazzdagg suggested--adding a 5.57" wire on the inside and connect to the antenna as kuster suggested to buy. Thanks!
scott -
do you have canon gear or other..
if canon gear, does it ever not fire or fire at random times.
thanks
Travisty10--I have the following gear:
Nikon D40
Gadget Infinity Cactus V2s
Nikon SB-800
I do not notice any misfires or random fires....Have you checked the discussion board on the Strobist group on Flickr? Maybe something there about canon
scott - doesnt vaddzagg suggest a 6.82" wire. You put down 5.57" in your post. im getting ready to add this wire now. thanks
Travisty10--Yes, the correct dimension is 6.82, but I subtracted the length of the "trace" on the circuit board so that the combination of the "trace" on the board + my wire + the antenna is 1/2 wavelength.
So, following this thread there appear to be 2 choices for the length of wire (excluding the antenna itself). Either 6.82" or 5.57".
The question remains - which is the best length? Logic says 5.57.
But I have just soldered a length of 6.82 to my transmitter, and I am nervous about trimming it back in case the signal gets worse and I have to resolder..
Does anyone have advice?
So which length is best? 6.82 or 5.57"?
I just soldered in 6.82, so I can trim if someone can clarify, but I don't want to gamble on shorter if the signal might get worse again...
i ended up cutting my wire back to 5.57 and it seems to work better.
I read through your post, ordered the parts, and tried the mod with 5.57 inch wire, and it works great! The setup is so much more reliable. Many thanks for creating the post, and thanks for putting up the part numbers as well. Much appreciated!
Thanks so much for this article.
I recently did this mod as well, based alot off of your post here.
I made a video of it here
http://www.youtube.com/watch?v=wXdMv_1xKcQ
Hi, i'v just done the modification following your instructions and it works very well.
Here is what it looks like now : http://www.flickr.com/photos/huruguen/2423188728/in/photostream/
Here is the distance range : http://www.flickr.com/photos/huruguen/2419040959/in/photostream/
Hi Kuster, I just modded mine after reading your guide. But my mod is a mixture based on yours, as well as other's idea.
Its here:
http://strobemonkey.blogspot.com/2008/04/cactus-v2s-trigger-mod.html
I'm trying to figure out which units output a higher voltage sync because I'm trying to hardwire a few of these receivers to some flashes I have. The ones labeled "PT-04 Receiver" work great however the ones labeled "cactus PT-04" and "Cactus V2s" do not fire the flashes at all.
Anyone know a mod to increase the voltage going out of the PC sync or know which triggers I need to buy to fire these flashes?
Nice set of instructions, I am going to do this mod with my V2s trigger.
I'll add my results.
5.75" wire plus antenna gives average distance up to 70 feet. +/- 30 feet (somehow depending on receiver). On short distances in closed area stability is also improved, so far haven't had any misfiring.. (~100 pictures taken).
So i do recommend this mod. :)
Thanks so much! I've done the transmitter mod so far and... WOW it really made a difference. I was getting 25ft distance before MOD and after well it's over 100ft! You did a great job on the tutorial.
BTW the 1/4 bit is PERFECT!
Rich Becker
www.richbecker.net
Curious about VaddZagg's 5+" wire addition. Does anyone know much about radio and using chokes (i.e. smaller inductor to electrically lengthen the antena? I used a small choke for an RC plane where I had to cut the rcvr antena wire and put a choke in-line.
Also, in close quarters, say w/in 15ft, what's the max sync speed most get way with Canon body and 580/430?
Thanks,
Roy
Here is my experience with this mod. Lots of pictures...
http://www.deciacco.com/blog/photography/gi-cactus-v2s-wireless-ebay-triggers-mod/
I have a question...
If I want more reliability, avoiding misfires and unwanted pops, but at a distance at 30 feet (this is the farther that I would use it), do I REALLY need the antenna?
What happens if I just use just the inner part of the antenna (coiled wire) plus the 2xAA battery pack?
Will it make more reliable?
Alright, I just did the TX mod and I've got 4 videos in the works showing both the modification Jeremy performed and the before and after results.
Quick summary...distance about doubled; however, realiability only marginally improved...before I was getting a 30% failure rate with two flashes..i.e. from about 10' from the two flashes (they were about 4ft appart), 3 of 10 shots resulted in one of the flashes not firing. Also, I saw sporatic firing at a level of about 1 non-inititated fire ever 5 minutes.
After the mod, again distance when from about 60ft working distance to 120ft working distance, but realibility only increased a bit to about a 20% failure rate.
I doubt the AA battery mod will increase realibility since the install battery is 3.3VDC no-load whereas 2 AA's are only about 3VDC no-load.
More to come...
-Roy
I was going to mod this thing... The trigger was probably expecting it because it just stopped working the next day I got it. Worked fine for a while when testing it immediately, but when I was actually going to use them, nothing.. no test button, no flash bracket. led's not blinking.. Anyone got an idea?
Just wanted to say thanks for the posting. I actually ended up doing the mod with 12.39" of coiled wire inside the housing since I already had everything laying around the house. Only thing that had been missing was time! If you can solder the mod only takes about 10 mins to perform. Most of that was waiting for the iron to get hot.
Mine made a big difference. I still have the occasional misfire but distance has been increased.
So until the radio popper jrs come out these are a great way to learn off camera lighting. Thaks again
Greg
Thanks for the inspiration and direction. I used your mods and made a small change to the receiver/battery alignment.
I've posted my test results, they're fantastic. 400 feet of useful sync-range. That's up from ~70 feet.
See the results: http://www.flickr.com/photos/illuminateworkshops/2699431034/
Has anyone tried this mod with the V2 models for Canon? I don't want to mess mine up.
Excellent Info. Did the mod on two xmitters. Range extended quite significantly, even through walls and floors. If I use my PocketWizard as the main xmitter and hook a PocketWizard receiver to a modified Cactus xmitter the range is just unbelievable. I can light practically anything with two Dyna-Lite packs, 2 SB-600's, an SB-50DX, and SB-28 and a Sunpack all firing together in a huge space. Thank You for the great work!!!!
Good write up. But...
I found a few problems with the second set up. Curling the wires that connect the antenna from the device does not increase range, but only does worse. Despite having the wire the specified 433 Mhz length, coiling it creates an inductance out of the wire. It will only reduce the power and range.
Your best bet is to have the wire as short as possible (both for signal and good connection!).
The BEST possible way to do this is to use coax cables that has the same impedance as the antenna. I believe yours is 50 Ohms. Space is limited though so you really can't do this unless you feed the antenna out the device haha.
Hey
Thank you for this article, but I have a question.
I can't find the RP-SMA connector on digikey, do you have the real reference or a link ?
thank you
Here is my tribute to your modification : http://destroyteam.free.fr/cactus-mod.php
The article is not totally written, i need to put more information inside, and also the link to this page !
Thanks for sharing this.
Hope my article will help the french people ;)
btw it is 1/4 drill for the antenna hole.
Im looking for that pc sync things..where do I get them at?
Just curious if you've noticed that the bulkhead SMA connector and the antenna are both male.
Well crap, I'm an idiot and ordered the wrong antenna. I'm assuming the correct one is the female mate.
I did this mod on mine. I did a quick test and got a range of 160 feet.
Is the wire supposed to be a certain length inside the transmitter?
Also, when the battery is dying in the transmitter (which seems to happen every 2-3 days (is that normal? 75-100 shots each day) it won't fire with the antenna attached, but works perfect without it. Anyone else notice that?
If you are buying in the UK then you can find the antenna here and the connector here.
It took me ages to find these!
hmmm
I did the modification as well.
before the mod i did a sequence of 79 photo's at 1/200 in my room and not a single misfire.
After the mod i was able to shoot from a 275 feet distance with a 50% failure which is good.
However.. when doing this same sequence in my room again i found a much higher rate of failure.
Actually 4 misfires out of 20.
And it sure isn't my flash!
could it be that this antenna mod gives more resistance?
Maybe the 12V batt isn't powerfull enough since i have been using that for half a year. Anyone ever replaced the 12V battery?
I all for cheap, but with all the hours that you would put in the modifications and all the material the final price will come up the same as buying a pocket wizards,,, i will rather spend my time I guess.. shooting
pomp, two things: One, if the receiver is right next to the transmitter (within a foot probably), I've noticed problems with reliability. But that's only if it's really close, a couple of feet and it usually doesn't matter. Not sure if that helps, but it's a thought. Also, definitely replace the 12v battery, especially if you are using the original battery that came with it. Battery life in both the transmitter and receiver seem to be key to reliability and affect the outcome pretty heavily. Even so, you shouldn't have to change the 12v very often, I think I've gone through 3 or 4 in a year and a half.
And Westside, 30 minutes and an extra $20 does not equal a pocket wizard. In fact even if you're really taking your time and take 2 hours and you manage somehow to screw up an entire transmitter/receiver set and have to buy another set and do it again, it's still not as much as pocket wizards. But thanks for the constructive criticism :-D
I just did this mod to my V2s. My flashes keep firing off randomly every time i put my Kaiser PC/Hot shoe cables on. Was wondering if anyone else had this issue.
Thanks for the great info! I just did your antenna mod with the 5.57 wire and it works amazingly well. Went to the corner of my basement with my wife in the opposite corner on the second floor and my 580ex fires everytime!
For those with a drill press it makes drilling the hole much easier. I gently clamped the base of the unit in my drill vise and lined everything up on the drill press. Then I simply put the top cover on without moving the base in the vise and drilled a small mark with the press. Then removed the base unit and drilled the hole in the top cover.
Still much cheaper than a pocket wizard setup as the parts only cost me $25 and besides, it was a fun little project.
Great tutorial! Very informative in how well worded and descriptive you were! You know they say that if one knows how to describe what they want really well, then life is just as good as how you describe it :)
Its great for people who feel like time is running against them and then land on your blog and feel like a whole burden was just lifted off of their shoulder.. I admire and respect people who take
time to make it easier for others.. Thanks a bunch! :)
Dell Notebook Battery
Great post and great mod too
However I've just finished it and when I plug the antenna its range decreases to inches and I don't know why because the battery is ok...so I'll keep investigating
Wow, you have made it look like simple. But certainly, it is quite difficult for first tmers like me. Nevertheless, I shall give a try.
Laptop Repair
Hey this is very nice and good tutorial you have posted here.Useful post.
Drug Rehab Directory
So what is the final consensus on the wire length inside the transmitter? And what is with the one person who is finding higher failure rate up close after the mod? Do you think it has anything to do with battery life?
On another note, has anyone tested results under varying interference levels from household equipment (wireless phone, cell phone, router, etc) to see if it affects the signal?
i see a lot of discussion about additional wire etc. Its not so difficult :-) A small antenna as used in this mod and some others is a helical type 1/4 wave. It needs a groud to function best. A 1/2 wave antenna does not need a groud. So, transmitting on 433 Mhz is about 70 cm (sorry, i'm european, 27,5 inch?). A half wave would require about 13-14 inch. Perhaps it is possible to add some plexible alu inside the house to compensate for the lack of ground when using the small 1/4 whips.
Greetings and happy holidays!
Jan
Hello,
I found my way here from flickr. This is a great write-up. I did this today and it has greatly improved the range and reliability of my cactus V2x triggers. Before the mod, I could barely get one to work more than a few inches from the transmitter, and the other was iffy over about 3-4 feet. Now, they both work reliably up to about 15-20 feet which is enough for my needs.
Sorry, that's supposed to read "V2s" triggers.
As for the lanyards: black wrist strap lanyards made for Nintendo DS consoles. They are stronger than mobile phone wrist lanyards and shorter than neck straps.
Latest film Clash of the Titans
In order to start the final struggle for power and fighting constantly with the King caused the human king and the gods of competition and confrontation, but only confrontatio n between the gods, it really could destroy the entire world, and let all have ceased to exist . . . . . . . . . . . . . . . . Zeus (with Muni Sen ornaments) the son of Perseus (Samuwoxin Cotton ornaments) While the identity of God is born into the human world, but was brought up as a human dependent - Even so, he was still no way to save his beloved family fled the Hardee's (Ralph Fiennes decoration) of revenge, he is from the God of Hell Hades. Perseus realized that he no longer has any care, he voluntarily assumed a . . . . . . . . . . . . . . . . . . . . . .
This week in the absence of any heavy videos showing the case has been shown around the 3D film "Dragon trainer in mind," became the biggest winner this week, to follow the trend of work, "The gods of war" completely to the one played rough. In the "trainer Long Ji", led by a seven-week exhibition of "Alice in Wonderland" and released 18 weeks of "Avatar" also continue to absorb road gold stampede. HP Pavilion DV5000 Battery|Dell Inspiron 1525 AC Adapter|DV1000 Adapter|Dell PA-12 AC Adapter|Dell Inspiron 5100 Adapter|8600 Adapter|Dell Inspiron 1501 Adapter|HP 417220-001 Adapter|Dell inspiron 1300 AC Adapter|Compaq keyboardHP/Compaq Laptop keyboardHP/Compaq Laptop keyboard|Compaq M2000 Keyboard|HP Pavilion zv5000 Keyboard|HP Pavilion NX9100 Keyboard|Laptop keyboard|HP Laptop keyboard|Laptops Accessories Wholesale| HP/Compaq Laptop keyboard| Compaq M2000 Keyboard The "Avatar" box office this week, has not declined, but later in the list were again last week to continue higher, up 21.4%. 3D video performance strong, regular film just ended up falling out both seats are reserved for the list, released last week, "the letter addressed to God," and has performed well in the "closed island" this week dropped out of the list, the " letter addressed to God, "43.5% decline in second week with the release of eight weeks of the" closed island "flat. top12 continued to fall, compared with last week, down 4.6%, to close at 114 million U.S. dollars.
The film "Dream" about a period of Daniel Wu and Yuan Quan in between, in order to "find" as the theme of the story. Daniel Wu emotional problems encountered mysterious dream Yuan Quan, doubt that she is the embodiment of his dead cat. This dream extended to Daniel's real life, he took the girl to resemble Yuan Quan in Shanghai continue to look for the dream girl............................................
Laptop Battery
acer Laptop Battery
apple Laptop Battery
asus Laptop Battery
compaq Laptop Battery
Dell Laptop Battery
fujitsu Laptop Battery
gateway Laptop Battery
hp Laptop Battery
ibm Laptop Battery
sony Laptop Battery
toshiba Laptop Battery
APPLE M8403 battery
APPLE A1078 Battery
APPLE A1079 battery
APPLE A1175 battery 1
APPLE a1185 battery
APPLE A1189 battery
Acer aspire 5920 battery
Acer btp-arj1 battery
Acer LC.BTP01.013 battery
Acer ASPIRE 1300 battery
Acer ASPIRE 1310 battery
Acer Aspire 1410 battery
Acer ASPIRE 1680 battery
i know this post is a few years old. but you didnt mention what kind of wire you used to to connect the antenna. what kind of wire did you use?
Automotive Diagnostic Tools & Equipment
Automotive Diagnostic Tools carries the scanners, code readers, engine scopes, timing lights and other diagnostic equipment you need to repair today's vehicles.
AD 900 key programmerbenz star 2000Toyota testerAK500 key programmerRenault CAN ClipFly 100 Hondax431Auto DiagnosticAutomotive DiagnosticVAS 5054Avolvo vida diceLexia 3Nissan consult 3 T300 key programmerBenz Star
Complex feelingsComplex feelingsComplex feelingsFeelings of the vortexComplex feelingsComplex feelingsComplex feelingsHollywood latest movieHollywood latest movieHollywood latest movieHollywood latest movieHollywood latest movieHollywood latest movieHollywood latest movieComplex feelingsComplex feelingsComplex feelingsComplex feelingsComplex feelingsComplex feelingsFeelings of the vortexFeelings of the vortexHollywood latest movieHollywood latest movieFeelings of the vortexFeelings of the vortexFeelings of the vortexFeelings of the vortexComplex feelingsComplex feelingsHollywood latest movieComplex feelingsComplex feelingsComplex feelingsLose weight
Very helpful tutorial, thank you. I was glad you provided some caution regarding the soldering!
Tin Lunch Boxes
Homemade Solar Panels
Great post - thanks!
- Pete from improve credit score
Well this is all new too me but a good tutorial that I could follow. Many thanks.
(You might like to check out my wedding site here Maid Of Honor Duties)
You has done a great work. I appreciate your work.I am highly oblige for this because it helps me a lot.
Dell Inspiron 6400 battery
Dell XPS M1530 battery
Dell XPS M1330 battery
Dell Inspiron 6000 battery
Dell Inspiron 1501 battery
Dell Studio 1535 battery
very nice work my friend, thank you for sharing your experience.
www.micro-tronik.com
that people undoubtedly enjoyed the high quality details you provide for the visitors Buy Movie Download
Awesome.
Thanks for this innovative info.
---------
Laptop Repair | Dell Support
What I want to know is why you didnt think to include the other side of this issue? There are so many things that youre missing here that I dont see how you could actually form an intelligent opinion on the subject. Its like you didnt even consider that there me be another side here. P90X workout | revabs | insanity asylum Im kind of disappointed.
I been going through distinctive websites each day and yours is definitely an intriguing an individual. We might vary in beliefs and fascination however i unquestionably could relate in your way with words.
Web Designing
Property in Noida
Thanks for the experiment. Such a wonderful resource.
Used cars
i know this post is a few years old. but you didnt mention what kind of wire you used to to connect the antenna. what kind of wire did you use?
Notebook Akkus
I was interested know about it lesbian bondage videos
Great info.I like all your post.I will keep visiting this blog very often.It is good to see you verbalise from the heart and your clarity on this important subject can be easily observed. shakeology Thanks again!
Thank you for this article, but I have a question.
I can't find the RP-SMA connector on digikey, do you have the real reference or a link ?fue Saç Ekimi
A very nice page. I think the effort has passed, we have to thank you:))
diş
They are just great! I love them all!Yes, the post is very interesting and I really like. Thanks for the share. It was very interesting and informative. Keep posting. I follow you.
PITTSBURGH TAXI
Dell laptop Battery
HP laptop Battery
Dell laptop adapter
HP laptop adapter
HP CQ40 adapter
sony vgp-bps2 battery
HP DV7 ac adapter
Dell D820 battery
hp pavilion dv4 battery
HP DV6700 adapter
HP DV7 adapter
Dell 1501 ac adapter
Hp Pavilion DV6000 battery
Hp Pavilion Dv6000 Adapter
Dell laptop battery inspiron 1525
Dell Inspiron 1501 battery
Dell Inspiron 1525 AC Adapter
Dell Inspiron 1545 AC Adapter
Dell laptop battery inspiron 1545
Hp Pavilion Dv6700 Adapter
Dell Inspiron 1501 battery
Hp Pavilion Dv6700 Adapter
Acer Aspire 5517 AC Adapter
Dell studio 1535 Battery
Dell studio 1537 Battery
Your website have very interesting article. I got knowledge from here. Besides that, your blog is so popular among the searchers from search engines. It means yours website is very good
website designing company
İzmir evden eve nakliyat
İzmir şehirler arası nakliyat
İzmir ev taşıma fiyatları
Evden eve nakliyat
Şehirler arası nakliyat
İzmir parça eşya taşıma
İzmir ev taşıma
izmir asansörlü nakliyat
İzmir evden eve taşımacılık
İzmir evden eve asansörlü
İzmir evden eve tavsiye
Karşıyaka evden eve nakliyat
Karşıyaka ev taşıma
Bornova evden eve nakliyat
Bornova ev taşıma
İzmir nakliye
İzmir evden eve nakliye
İzmir nakliyeci
İzmir kurumsal taşıma
https://izmirevtasima.com/
Sarkari Result : sarkari-result.us सरकारी रिजल्ट्स provides you all the latest govt/Sarkari Results, Govt Jobs, Admit Cards, in various sectors such as..
Thanks For Sharing Nice article - Java Vogue
I appreciate the tutorial which you shared to the readers. I hope many readers liked it and I also started to read it. If I don't understand anything, I will let you know. european car brands
Thanks for the article really helpful would u visit my website on: Kampus terkemuka
Post a Comment